This post is sponsored by Shepherd Song Farm.
Recipe by Alan Bergo of Forager | Chef
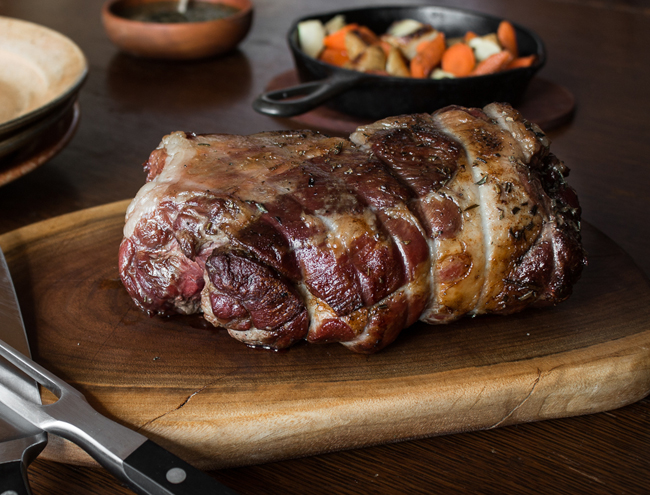
A roast leg of lamb makes an impressive traditional display on any Easter table. A roast leg of goat is every bit as striking, and in my mind, qualifies as an even greater delicacy.
But in today’s busy, grab-and-go world, cooking any piece of meat larger than a steak or a chicken breast can feel intimidating. Let’s be honest, there’s a reason special-occasion dishes are reserved for special occasions. Feastworthy meals can be time consuming to produce, and for most of us, serving up a hefty leg of goat or lamb on a weeknight just isn’t practical.
Big chunks of meat also tend to be pricey, and the idea of investing in something you can’t be certain will turn out right can be enough to make you think: “Hmm. How about chicken wings?”
What a lot of home cooks don’t realize, though, is that prepping and cooking a big cut of meat can actually be easier and more forgiving than working with smaller cuts. You just need to know a few basic principles and a have a simple trick or two up your sleeve.
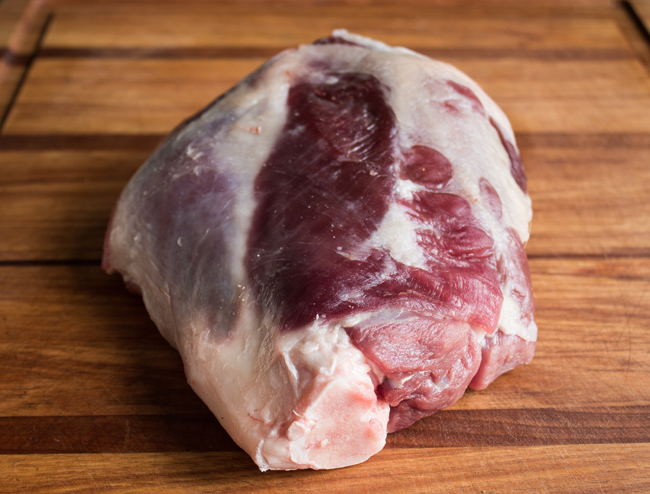
So below I share my favorite method for serving up a flawless roast leg of goat or lamb on your first try. It employs a surprisingly simple kitchen hack known as the reverse sear.
This method, popular for steaks, is something I learned while cooking at Heartland in St. Paul, where I needed to be able to produce perfectly rested cuts at a moment’s notice. Serving up big roasts on a daily basis, I was able to fine-tune a method I’ve found to be virtually foolproof, even for beginner home cooks.
When working with a whole lamb or goat leg, this method requires deboning the meat first, but fear not: As long as you have a super-sharp knife, it’s not nearly as hard as it sounds (see pictures and detailed directions below).
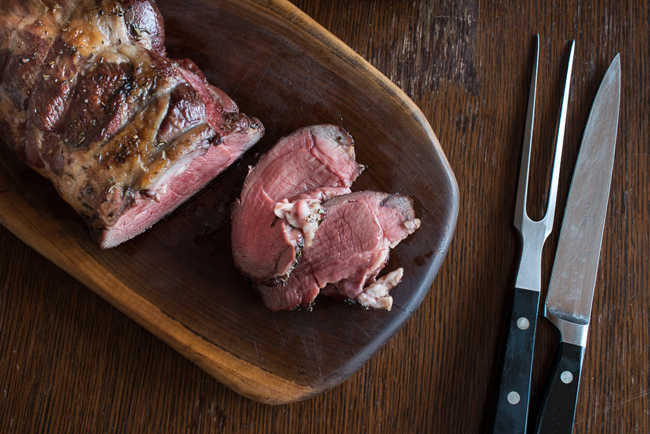
From there, the rest is easy: You cook the meat at a low heat (I like 250°F). When the meat comes up to the desired temperature (see guidelines below), you take it out of the oven, rest it thoroughly, then sear it in a hot pan on the stovetop and serve. The result is a perfect, evenly cooked rosé interior and a beautifully browned crust.
My favorite lamb and goat to work with comes from the heirloom breeds raised at Shepherd Song Farm, a 100 percent grass-fed operation based in Wisconsin. Their animals are never fed antibiotics, and unlike those on a lot of farms that claim the term “pasture raised,” which can be a bit vague, their lambs and goats spend about 90 percent of their time happily perusing the beautiful Wisconsin countryside.
If you’ve only eaten lamb or goat imported from Australia or New Zealand, you might be shocked at the lack of gaminess in the local stuff from Shepherd Song. The mild flavor is due in part to the way these animals are raised and fed and in part to the prime genetics of the heirloom breeds (Ile de France lamb; Boer and Savannah goats. Not in the Midwest? No problem. Shepherd Song takes mail orders online and delivers all over the country.
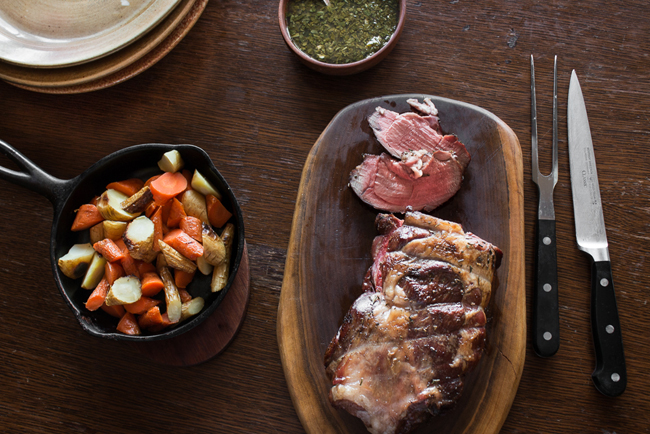
PERFECT ROAST GOAT OR LAMB LEG (USING THE REVERSE SEAR METHOD)
Alan Bergo
Serves 4-6
You might wish to start preparations a day, or at least a few hours, in advance to give the salt and seasonings extra time to work.
Temperature guidelines:
Cook the leg in the oven until it hits the following temperature for the doneness you prefer. I like mine around 130ºF.
Rare: 120ºF
Medium rare: 130ºF
Medium: 140ºF
Medium-well: 150ºF
Equipment:
Heavy saute or cast iron pan for searing
Digital thermometer
Roasting pan with a rack
Kitchen twine for tying the roast to ensure even cooking
Ingredients:
Flavorless, high-heat cooking oil, like grapeseed
Aromatic herbs like rosemary, sage and thyme, finely chopped to yield ¼ cup
1½-2 teaspoons kosher salt, or more to taste
1 teaspoon freshly ground black pepper, or more to taste
1 goat or lamb leg, roughly 3-4 pounds before removing the bone
Deboning:
First, remove the bone, I like to save it to make soup or broth afterwards.
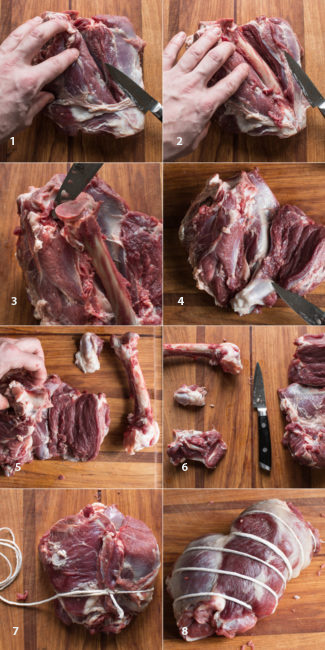
1. Locate the central bone of the leg.
2. Using a sharp paring knife begin to reveal the bone, following the seams between the muscles as much as possible.
3. Continue revealing the central bone.
4. After removing the central bone, remove the connecting bone and tissue.
5. Use your fingers to find the remaining two bones and firm tissue.
6. The finished deboned leg. Note the central bone and two large pieces of bone/tissue.
7. Note: See the recipe below, and season the meat before completing this step. Using kitchen twine, tie the leg as tightly as you can to ensure even cooking; it doesn’t need to be perfect.
8. The finished deboned and tied leg, ready for cooking.
Salting, Searing and Roasting
1. Season the meat with salt, pepper and herbs inside and out. Roll the leg up tightly and tie with kitchen twine to ensure even cooking, then let it sit uncovered in the fridge overnight. The salting helps to dry out the meat surface, which makes searing it effortless, but it’s optional. If you don’t feel like seasoning the meat overnight, try to do it a few hours beforehand. I also like to bring the meat to room temperature before I cook it. I’ve found about 1.5-2 teaspoons of kosher salt for a 3-4 pound goat leg is great.
2. The next day, 1½ hours before you want to serve (assuming a 3-4 pound leg) preheat the oven to 250ºF and place the leg in the oven. Set a timer for 1 hour, and take the temperature in the middle of the roast with the thermometer. When the internal temperature comes up to your target temperature, remove the leg from the oven and allow it to cool on its rack in a warmish location for 15-20 minutes. You could even turn the oven off and let the roast rest in there with the door slightly ajar.
3. Meanwhile, heat up your sides and garnishes and prepare to serve.
4. Finally, heat a few tablespoons of oil in the saute or cast iron pan on high. Turn on the hood, and or open a window, since you’ll be using high heat for a few minutes. When the oil is just starting to smoke gently, reduce the heat to medium-high and brown the roast deeply on all sides.
5. After the roast is browned, transfer to a cutting board, remove the twine, cut into slices with a sharp knife, and serve immediately.
