
Not all maple syrup comes from deep in the forest. Wildlife freelance writer and author of Abundantly Wild, Teresa Marrone, makes this “genuine slow food” from two maple trees in her front yard in southwest Minneapolis, and you can, too.
It’s late afternoon on a rainy, 46-degree day, and Marrone is collecting sap from the two “pretty darn old” maple trees in her front yard. Her voice competes with the steady stream of cars hurrying home along the busy street that borders the south side of her yard as she explains her method for making small-batch maple syrup.
The season for maple syrup making in the Twin Cities is short, typically no longer than three weeks, Marrone explains, and is dependent on the temperature change that occurs between winter and spring. For this reason sap collection in Minnesota maples usually begins in mid-March when the air temperature consistently rises above freezing during the day and dips below freezing after dark — the necessary condition for adequate sap flow. This change in temperature causes a contraction and extraction “pumping effect” within the root system of the tree, which, in turn, causes the sap within to run freely. Marrone points to the new buds on the tips of the branches on her silver maple as a good indication that its sap is flowing. The speed is relative to the trade, however, as a drop every 30 seconds is considered a good, fast flow. “Some years the sap will run until mid-April,” Marrone says.
Step 1: Tapping the tree for sap
Marrone, who is in her third season of making maple syrup, begins the process by “tapping” both of her trees for sap. She first drills a hole deep enough to penetrate the newer, outer rings of each trunk — about one inch — as this is where the sap flows. Her sugar maple, which is 10 inches in diameter — the required width for tapping — gets one hole; the much larger silver maple exceeds the 14-inch requirement for multiple-hole tapping and, therefore, can safely accommodate two. Each hole is drilled large enough to fit the roughly six inches of copper plumbing tubing Marrone inserts into each. By the end of summer, these holes will have begun to fill in as the trees self-heal.
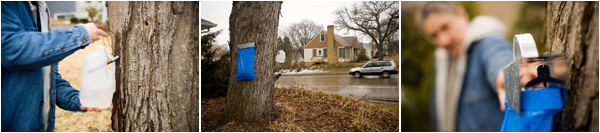
On the sugar maple, Marrone has slung, with metal wire, a capped, gallon, plastic jug, which collects the watery droplets of sap through a small cut-out near the top of the container. The sap drips in a languid procession like a faucet with a slow leak, the beads fattening at the tip of the tubing until they’re ripe enough to fall.
On the silver maple, she uses a more professional sap collecting system: a sturdy, blue, plastic bag connected to the trunk with a stainless steel clip — much like a very large chip clip — both made especially for sap collection and purchased at the Minnesota Landscape Arboretum in Chaska.
Straight from the tree, the sap is the consistency of water, crisp, cold, and subtly sweet.
Step 2: The first boil
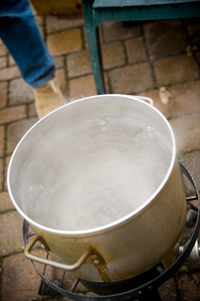
The next step, and the longest, is the first of two high-heat boils, which she takes to a large, stainless steel stockpot on a propane burner on the patio in her small backyard. This boil, Marrone says, “is just driving off as much water as fast as [I] can.” On this day, she is boiling down four gallons of sap, which she collected between morning and mid-afternoon, in three hours. Her purpose, “to get the content small enough to fit inside a smaller, [five-quart] stockpot” inside her house (which she shares with her husband, Bruce, a graphic designer, and their loquacious parrot, Tuca) for the second boil.
The sap is 2 percent sugar straight from the tree, and the first boil raises the sugar level to 67 percent. As it cooks, white flecks of minerals appear on the sides of the pot where the sap bubbles. The sap also develops a slight viscosity and turns light amber.
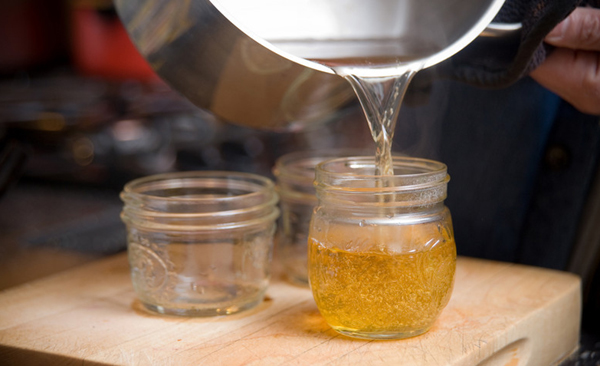
When the sap is boiled down to within a few inches of the bottom of the pot, Marrone brings it inside, strains it through a wire mesh strainer lined with a white T-shirt in the kitchen sink to remove the mineral flecks and other debris (which sometimes, though rarely, includes sweet-toothed ants), and pours it into a two-gallon pot on the stovetop and turns the heat to high. At this point, it can reasonably be identified as syrup.
Step 3: The final boil

This second and final boil only takes a half-hour, but requires much more precision than the first, as a temperature of seven degrees above boiling (219 degrees Fahrenheit, according to the professionals), indicates a finished product. “You’ve really gotta watch it,” Marrone warns. If the syrup is left to boil to0 long, it crystallizes. But Marrone doesn’t sweat this. “I used a ‘ruined’ batch for caramel rolls. They were so yummy and crunchy on top.”
As the syrup’s temperature reaches boiling, a soft, honey-like scent rises with the steam, and its tawny color becomes more golden, lightly caramelized.
Marrone admits that home syrup-making leaves some wiggle room for testing whether the syrup is done. “I can watch by the bubbles and tell how it’s doing … because the bubble pattern gets different as it gets closer to being finished.” Peering into the pot, she sees bubbles as clear as Windexed glass form a crisp dome of froth across the liquid. Here, the syrup has been reduced to about two cups from its four-gallon starting point.
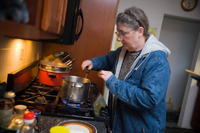
Another test she uses is the somewhat self-evident “spatula test.” Marrone dips a metal spatula into the hot syrup and lifts it, thin-side down, above the pot. What she wants to see is two drops from opposite ends of the spatula slide toward and merge in the middle then fall as a thin sheet off the edge of the spatula. This is “an unreliable method,” though, she says, as the metal tool will heat up in subsequent tests.
When it reaches the ideal temperature, Marrone cans the syrup, which a few lucky friends and family will receive as gifts throughout the year. Marrone doesn’t sell hers; she simply can’t produce enough from two trees. But as artisanal syrup, she imagines she could charge $12.00 for a half-pint glass jar. The small batches also mean that she is wary to submit her syrup to the Minnesota State Fair “because [understandably!] they require so many jars, and I want to keep mine for myself.”
The finished product
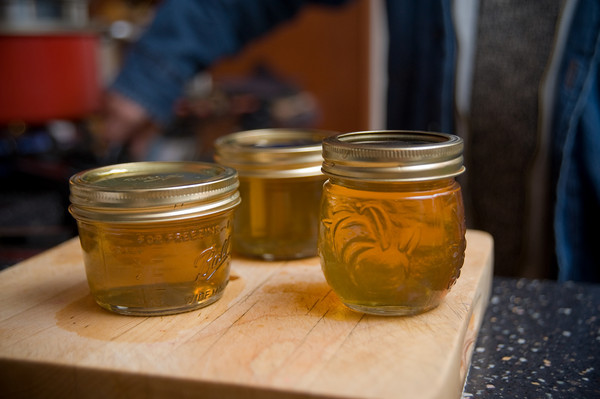
The finished syrup will vary in color depending on when the sap was collected. Sap captured early in the season, Marrone explains, is pale amber and has a very delicate maple flavor. “It’s almost too subtle to perceive the maple for a lot of people,” she says. On grocery store shelves, these batches are called “Grade A Light Amber.” These early-season batches also contain a higher sugar content, which contributes to their pale color because they require less cooking time to reduce. Grade A medium and dark amber come later, respectively, in the season. And Grade B, which Marrone says “a lot of chefs prefer because it has a [more concentrated] maple taste,” is from sap collected late in the season and is darker, akin to dark corn syrup, than Grade A maple syrup. Grade C also exists, but Marrone has never seen it.
Marrone says most homemade maple syrup is naturally artisanal because it is made in small batches and comes from a single source. Home syrup-makers have the advantage of boiling their sap immediately after it is collected, which results in a higher quality syrup. She knows that many commercial maple syrup producers purchase frozen sap from a variety of sources and boil them together. And unlike the high fructose corn syrup-laden Mrs. Butterworth’s, Marrone’s maple syrup is honey-sweet but not cloying, thickened but not gluey. In taste and texture, it really is just a cleanly caramelized expression of the sweet water from which it was reduced.
Three seasons ago, when her first batch resulted in sweet, edible syrup, Marrone remembers, “it surprised the heck out of me.” As she’s become more deeply drawn into syrup-making, Marrone has noticed something else she didn’t expect: “Trees in the city, I think, tend to produce better syrup than trees out in the country [or in forests].” Her theory is that city trees “don’t have as much competition [for water] from other trees.” Plus, she says, city trees often have a better chance of receiving regular waterings during droughts.
Mighty cool! Makes me wish our lot was filled with maple trees instead of these darn oaks that stubbornly hold on to enough leaves through the winter to make spring raking a possibility.
One again I am impressed by Ms. Marrone’s ability to to manipulate the nature around her into a marvelous treat. I thought that all maple syrup came only from sugar maples and now I learn that even silver maples produce a good sweet syrup. Great article and only one if many interesting stories she writes and publishes about wild foods.
I did not realize how easy it was to make maple syrup. With a little time and patience you can have your own syrup for an entire year. The article explained the process very well and I think I will save this and use as a fun get-together activity with friends. Brilliant!
Lots of wonderful information… great article.
I have two good-sized silver maples in my yard. Am putting a reminder in my calendar to tap them next March. How fantastic that I can make syrup at home! Thanks for a great article!